

Easy Indoor Sun-Drying: Foolproof Methods for Dried Vegetables and 4 Drying Techniques
"Thank you very much. Good job."
I received a slightly large brown cardboard box from the delivery person, hugged it in my arms, and quickly moved from the entrance to the living room.
"Hehe, it's here, it's here!"
I took out a "dried vegetable basket," a little less than 40cm in diameter, neatly packed inside the box.
"Things can't start without this, can they?"
I was about to embark on a new hobby. My younger sister, who works as a writer for a publishing company, started a series of articles about "dried vegetables," and after reading them, I immediately decided to try making "dried vegetables" at home.
Dried vegetables can be easily made at home by anyone if they have the right tools and environment. One of the necessary tools is a "bamboo basket" for drying vegetables, and I immediately found a good product online.
When making dried vegetables, use a well-ventilated basket or net. If making them indoors, arrange the vegetables, cut into appropriate sizes, on these baskets or nets, and use a fan or circulator to blow air over them. This way, the vegetables can be dried evenly. By following these steps, it is said that dried vegetables can be made relatively easily indoors.
If you can secure a sunny spot, another method is to place the baskets or nets by a window and expose them to natural light. It's very convenient that there are these two methods for making dried vegetables indoors.
《Important point: When arranging cut vegetables, make sure they don't overlap! Humidity is the enemy!》
Reading my sister's article, I involuntarily let out a "Hmm."
"I used to teach her when we were kids, didn't I?"
Recalling my sister and myself as children, I was filled with a complex, warm feeling – a little happy, a little sad, and yet proud of my sister.
"Your article on how to make dried vegetables indoors was very clear and easy to read."
I sent a message to my sister, attaching a photo of the dried vegetable basket that had arrived. It's easy to imagine that my sister was stunned that night that her lazy older sister had suddenly taken up dried vegetable making.
"What kind of vegetables should I make dried vegetables with?"
My new hobby has just begun.
Episode 3: Making Dried Vegetables on a Condo Balcony! An Urbanite's Guide to a New Habit
 Basic Methods for Making Dried Vegetables Without Failure
Making dried vegetables is truly simple. Just cut the vegetables and arrange them in a well-ventilated area. No special tools are needed.
First, let's choose the vegetables to use. Vegetables bought at the supermarket, leftover vegetables in the refrigerator, and even parts that tend to be discarded, such as peels and stems, can be excellent ingredients. Click here for recommended vegetables.
Wash the vegetables and wipe off any moisture thoroughly. If moisture remains, it will not only take longer to dry but also cause mold, so be careful. Root vegetables can be used with their skins on, but if there's soil, wash it off thoroughly.
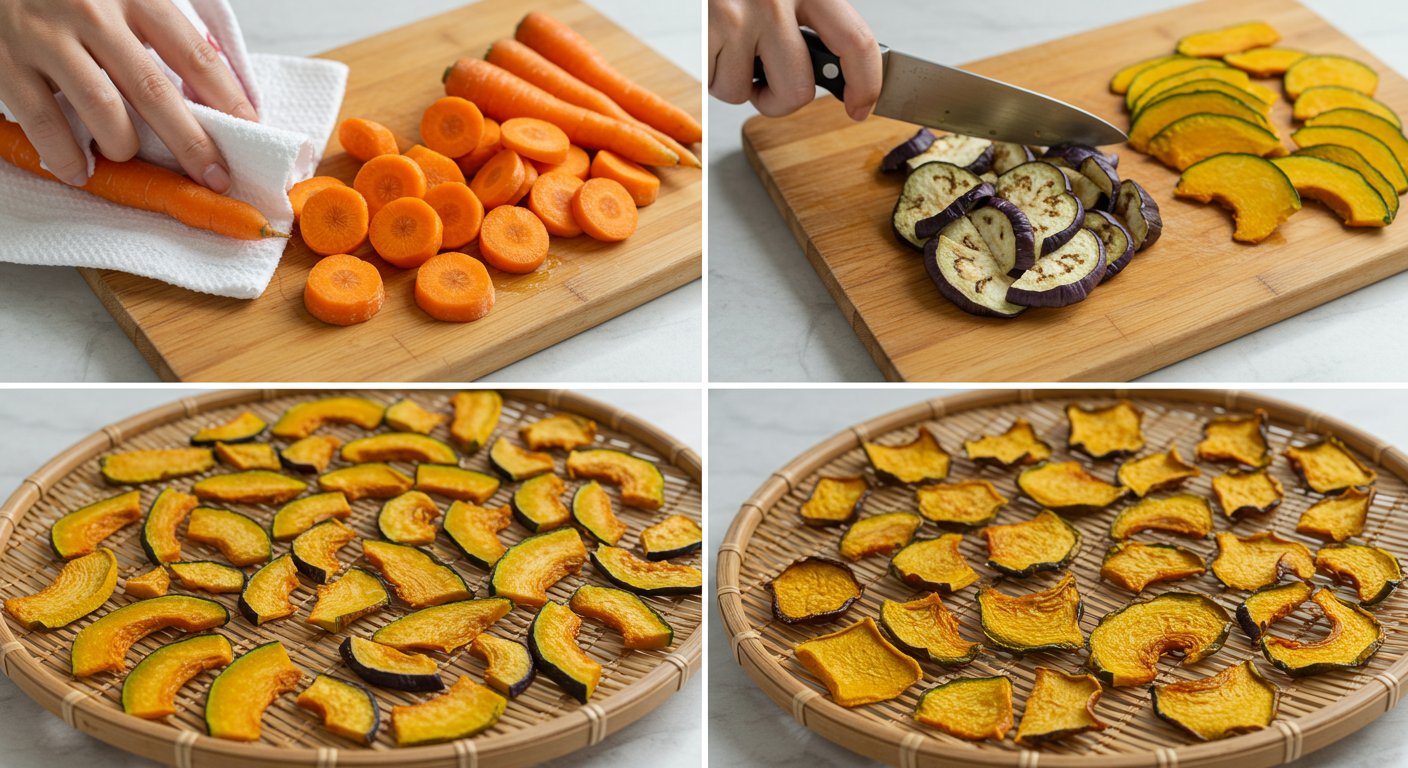 Next, cut the vegetables into uniform thicknesses. Aim for about 5mm to 1cm. If they are too thin, they will dry out too much and lose flavor; if they are too thick, they will dry unevenly. Arrange the cut vegetables on a well-ventilated item such as a bamboo sieve, net, or drying basket, making sure they don't overlap. The trick is to space them slightly apart to prevent uneven drying caused by overlapping vegetables.
Then, simply place them in a well-ventilated area and wait for them to dry. Adjust the drying time according to how you plan to use them. Semi-dry might take a few hours to half a day, while thoroughly dried might take 1 to 2 days. This will also vary depending on the weather, temperature, and humidity, so check on them occasionally.
What do you think? It's surprisingly easy, isn't it?
4 Drying Methods and Their Characteristics
There are actually several ways to make dried vegetables. Let's learn about the characteristics of each and choose the method that suits your environment and purpose.
1. Sun Drying (Outdoor Drying)
The most traditional method is sun drying. This involves drying vegetables using sunlight and wind.
It's best done on a clear, sunny day in a sunny and well-ventilated area like a balcony or garden. The sun's UV rays also have a sterilizing effect, allowing for hygienic drying. However, it's advisable to use a drying basket or net to protect against insects, birds, and dust.
The greatest appeal of sun drying is that the vegetables' flavor is enhanced as they slowly lose moisture under the sun's blessings. Root vegetables and mushrooms, in particular, become sweeter when sun-dried. However, the downside is that it's dependent on rain and humidity.
2. Indoor Drying (Shade Drying)
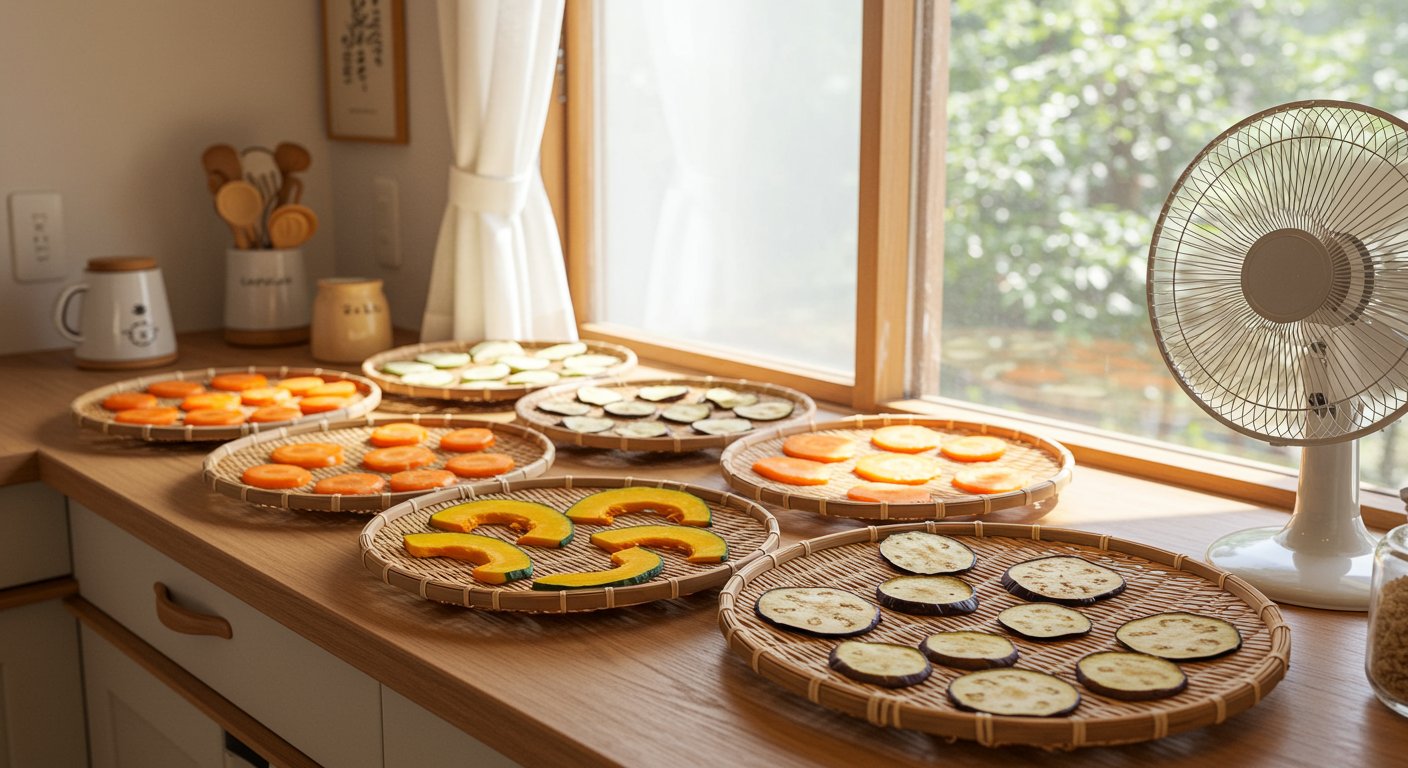
The advantage of indoor drying is that you can make dried vegetables anytime, regardless of the weather. Choose a bright and well-ventilated spot, such as near a window.
Avoid direct air conditioning drafts, and using a fan or circulator to gently circulate the air will be more effective. Indoor drying takes longer than sun drying, but it has the advantage of preserving the vibrant color of the vegetables.
Indoor drying is particularly suitable during the dry winter season. During the humid rainy season, it's a good idea to use a dehumidifier in conjunction.
 3. Microwave Drying
Microwave drying is convenient when you're short on time. It allows you to make semi-dried vegetables in a short amount of time.
Cut vegetables thinly and uniformly, then arrange them on a heat-resistant plate lined with kitchen paper, making sure they don't overlap. Heat at 500W to 600W for 2 to 3 minutes, then remove and check their condition. If they are still damp, continue heating for an additional 30 seconds to 1 minute at a time.
While microwave drying is quick, its drawback is that it can lead to uneven drying. Also, it's difficult to dry vegetables completely, so it's recommended to store them in a semi-dried state in the refrigerator and use them up quickly.
4. Using a Food Dehydrator
The easiest and most reliable method is using a food dehydrator. You can make uniformly dried vegetables by simply setting the temperature and time.
Most household food dehydrators allow temperature settings from 35°C to 70°C, which can be adjusted according to the type of vegetable. Drying slowly at a low temperature preserves the natural flavor and color of the vegetables.
While it requires an initial investment, the advantage is that you can make dried vegetables hygienically and independently of the weather. This method is especially recommended for those who want to seriously get into making dried vegetables.
I personally use sun drying on sunny days and a combination of indoor drying and the microwave on rainy or busy days. The trick is to flexibly choose the method according to the day's weather and your schedule.
Common Mistakes and Solutions in Making Dried Vegetables
When making dried vegetables for the first time, there are a few points you should be aware of. I'll introduce common mistakes and their solutions.
First, spoilage due to insufficient drying. Even if they appear dry, if moisture remains inside, it can cause mold or spoilage. Check if the vegetables are dry to the core and dry them until they are slightly firm.
Conversely, drying them too much can cause them to lose flavor. Aromatic vegetables (like herbs) in particular lose their scent if over-dried. The trick is to adjust the drying level according to how they will be used.
Uneven drying is also a common mistake. If vegetables are cut unevenly or dried overlapping, some parts will dry differently. It's important to cut them into uniform thicknesses and arrange them without overlapping. Drying on humid days not only makes them harder to dry but also increases the risk of bacterial growth. Choose a sunny day or a day with low humidity, and if indoors, use a dehumidifier or fan.
By keeping these points in mind, you can make delicious dried vegetables without failure!
Summary: Enrich Your Diet with Dried Vegetables
Making dried vegetables is a culinary wisdom that anyone can start, requiring no special tools or expert knowledge. The simple act of cutting and drying vegetables enhances their value and enriches your diet.
By drying non-standard or leftover vegetables, you can reduce food waste and preserve highly nutritious ingredients for a long time. And above all, the appeal lies in the fact that drying concentrates the vegetables' natural sweetness and umami, leading to new delicious discoveries.
It's also great that you can choose from various methods such as sun drying, indoor drying, microwave, and food dehydrator, depending on your environment and purpose. It's recommended to start with simple vegetables and gradually expand your repertoire.
The world of dried vegetables adds a touch of creativity and richness to your daily meals. Why not start your dried vegetable life today?
Related Products
Learn More About Dried Vegetables
- 5 Easy Steps to Making Dried Vegetables
- How to Rehydrate Dried Vegetables | 10 Minutes to Restore Plumpness and Umami
- How to Store Dried Vegetables and Their Shelf Life
- Miso Soup Transformed with Dried Vegetables! The Ultimate Ingredient with Concentrated Umami
- 7 Exquisite Soup Recipes Made with Dried Vegetables
そのほかの乾燥野菜ブログ
View all